The pickle man

Sunday, November 20, 2011

Pecan Pie

It's that time of year again!  Pecans are falling off of trees all over the place!  (and it's almost Thanksgiving, but that seems secondary to pecan season right now)

This is my favorite version of pecan pie.  The recipe comes from the Cotton Country Collection - the local Junior League's first cookbook, published in 1972.

And yes, my grandmother's famous "Pea Goo" also appears.  I'll save that recipe for later in the week.

Anyway, it's duck season, too, so I was entertaining the boys by myself this morning.  And we made pie!

And since it's also Thanksgiving season, be expecting to see a lot of related posts this week :)  In the meantime, here are some old favorites that are Thanksgiving-worthy:
Pumpkin cheesecake
Macaroni and cheese
Roasted brussel sprouts
and French bread

and coming soon, my FAVORITE Thanksgiving side - Spinach Madeline

But back to the pie.  I don't actually bring this anywhere for Thanksgiving (my husband's sister is in charge of pecan pie and you don't mess with tradition!)... but my husband was begging for one a little early. 

Start out with an unbaked pie crust.  If you want to make your own, I highly recommend this one by Smitten Kitchen.

Just be forewarned, if you let your 5 year old roll out the dough, it may not be as even as you would like.  However, since my pie crusts are rarely things of beauty anyway, it's nice to have an excuse!


And he definitely had fun!


As for the filling, it's pretty basic.  Eggs, sugar, Karo light corn syrup (to which my son said, "I thought you said corn syrup is bad for me"... sigh).

And some flavorings - a little lemon juice, salt, and vanilla.  And a splash of bourbon, if you're so inclined.

Then 1 cup of roughly chopped pecans...

AND (and this is what truly sets this pecan pie apart)  browned butter.

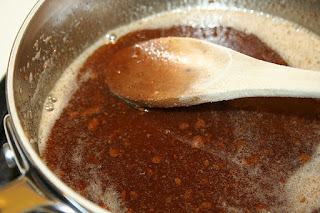
Basically, you take a stick of butter and heat it in a saucepan until it smells nutty and brown and delicious.  Then let it cool and pour it in with the rest of the pie filling.

Pour the filling into your pie crust and bake!

Here's the recipe:

Ingredients:
1 stick butter, browned
1 cup sugar
1 cup Karo light corn syrup
3 large eggs, beaten
1 tsp vanilla
1 Tablespoon bourbon (optional)
1/2 tsp lemon juice
1/4 tsp salt
1 cup chopped pecans
1 unbaked pie shell

In a saucepan, brown the butter.  In a separate bowl, add the ingredients in the order listed. Blend in the browned butter.  Pour into the unbaked pie shell.  Bake at 425 for 10 minutes, then lower the oven temperature to 325 and bake for another 40 minutes.  Let cool.

Delicious with ice cream, whipped cream, coffee... and turkey!

Saturday, November 12, 2011

Waffles - a Saturday morning tradition

When I was growing up, my mom was definitely the chief cook in the house.  But dad had certain specialties - chili, steaks on the grill, and waffles on Saturday morning.

Michael and I got a waffle iron for a wedding present and used it a few times when we lived in New Orleans.  Then we had kids and the whole thing seemed like too much trouble... but I couldn't get rid of it, largely because of the memories I had of making "polka-dot" waffles with my dad on Saturday mornings growing up.

And then a few weeks ago, on a Saturday morning, Dixon asked what was on top of the fridge.
I wiped off the dust and showed him the waffle iron.  And we decided to make waffles.

Currently we do this every Saturday before his soccer game.  I freeze the extras and give them to the baby on school mornings -- they reheat just like Eggos.

Preheat the waffle iron then mix together the ingredients.
William demonstrates the importance of NOT over-mixing the batter.


Then you pour the waffle batter onto the hot iron.


Pouring by mommy... photography by Dixon

Oh, and to achieve the "polka-dot" effect, you can either use blueberries or chocolate chips. 


Either way, they are delicious!


Dry ingredients:
2 cups flour (can substitute up to half of this with whole wheat flour)
1/2 tsp baking soda
1 tsp baking powder
1 tsp salt
3 Tablespoons sugar

Wet ingreditents
3 large eggs, beaten
2 cups buttermilk, shaken
2 Tablespoons butter, melted and then cooled

Combine the dry ingredients with a fork.  Stir in the wet ingredients.  Do not overstir - the batter should remain lumpy.  Spray a hot waffle iron with cooking spray.  Pour the batter onto the waffle iron and cook according to the manufacturer's directions.  Serve with butter and syrup.

Sunday, November 6, 2011

Pumpkin Cheesecake


I bought my first LSU shirt yesterday afternoon.  I've always liked the tigers -- it's part of living here -- but I never attended LSU, and neither did any of my 4 siblings, or my husband, so I never really got around to buying a shirt.  But yesterday, we were invited to watch "the game of the century" with some friends.  And since the last time they had us over, I (inadvertently) dressed my son in the opposing team's colors, I decided to go shopping. That way, no one would make him stand on the porch if LSU happened to get behind.

I also brought this:

The game was amazing, and the dessert was pretty good, too.


The best part of this cheesecake might be the crust.  When reading over cheesecake recipes (all of which seemed to use a graham cracker crust), I thought, why not ginger snaps?  Same cookie crunch, but lots more fall flavors.

 Start with 20 gingersnaps in the bowl of a food processor (3/4 cup crumbs - if you use smaller cookies, it will take more -- and about that, this was MUCH better when I used Anna's ginger thins instead of the thicker cookies shown here). Pulse until they turn into fine crumbs.  Then add 1/2 cup pecans. 
Pulse again.
And add 1/4 cup white sugar and 1/4 cup brown sugar.
And add 1/4 cup (1/2 stick) melted and cooled butter.

Then, have your adorable son grease the bottom and sides of a spring-form pan.  This boy LOVES butter.

Press the crumbs into the bottom of the pan.  Then make the filling.


Blend until smooth, then pour into the springform pan.
 Don't worry if the cheesecake splits.  Mine ALWAYS seems to.  But the topping more than makes up for it -- whipped cream sweetened and spiced with cinnamon, ginger, and nutmeg.


Here's the recipe (adapted significantly from Smitten Kitchen)
Note: this recipe is not difficult, but it gets lots of bowls dirty... so clear out your dishwasher before you get started.


For the crust:
3/4 cup gingersnap crumbs (20 cookies - Anna's Ginger Thins are the absolute BEST for this)
1/2 cup pecans
1/4 cup brown sugar
1/4 cup white sugar
1/4 cup (1/2 stick) melted and cooled butter

Combine first four ingredients in the bowl of a food processor.  Add melted butter.  Press into a greased springform pan.

For the filling:
3 (8 oz) packages cream cheese, at room temperature (this is very important!)
1/2 cup packed light brown sugar
1/2 cup white sugar
2 tablespoons heavy cream
1 teaspoon vanilla
1 tablespoon bourbon (optional)
1 tablespoon cornstarch
1 1/2 teaspoons cinnamon
1/2 teaspoon nutmeg
1/2 teaspoon ground ginger
1/2 teaspoon salt

1 (14 oz) can pumpkin (1 1/2 cups)
3 eggs at room temperature


Put the cream cheese and sugars in the bowl of a mixer.  Beat on high for 3 - 5 minutes until very smooth.  Add the other ingredients in the order listed, beating well after each addition.  Add the eggs one at a time, beating well after each.
Pour this into the springform pan on top of the crust.  Bake at 350 for 50 minutes, then turn off the oven BUT DON'T OPEN it.  Allow the cheesecake to cool in the oven for at least an hour (I always let mine stay there overnight).  Remove and refrigerate for at least 2 hours.  Bring to room temperature before serving (and topping).

*I still have trouble with this cake splitting.  I have tried putting a pan of water underneath it in the oven, and decreasing the temperature by 5 - 10 degrees, with occasional success.  Thank goodness for the topping, which hides the cracks!

For the topping:
1 cup heavy cream, whipped until stiff peaks form
3 Tablespoons powdered sugar OR 3 tablespoons real maple syrup (did this the last time and it was an amazing change)
1 1/2 tsp cinnamon
1/2 tsp ginger

Blend the sugar and spices into the whipped cream, scraping down the bowl frequently.  Either serve alongside the cheesecake in a bowl or pipe on top of the cheesecake (if you are worried about unsightly cracks).

This would be perfect for a different Thanksgiving dessert.  Enjoy!

*A note about ingredients: lots of people ask me about what brands I buy for this cheesecake.  The only ones that seem to make a difference are the gingersnaps (I love Anna's Ginger Thins) and the cream cheese.  I buy Philadelphia for this.  I think the generic brand has too much water, so it doesn't have as smooth of a texture.  I also do not toast the pecans first (as I do in most desserts) because they get plenty brown while the cake cooks.  Also, if you do substitute maple syrup for powdered sugar in the topping, make sure to use the real stuff, not maple-flavored corn syrup :)  Happy Turkey Day!

Saturday, November 5, 2011

Crawfish Etouffee

In many ways, Louisiana is a state divided.  People draw the line either around I-10 or around Alexandria, depending on who you ask.  We on the north side like to claim close relationship to our more cultured cousins down south, but at the end of the day,  collard greens and venison smothered steaks belong squarely on my side, and etouffee belongs down there.

Still, I love the stuff.

And I do have a few qualifications on my side.   My grandmother grew up well south of I-10 in a little town called Franklin, about 8 miles off the gulf.  My husband and I lived in New Orleans for four years - right up until Hurricane Katrina.  And cleaning out a duplex 4 weeks after the storm definitely qualifies me for... something (perhaps lunacy?)

So tonight, I got in touch with my Creole heritage.  I opened a bottle of red wine, danced with my baby to the Meters, and made crawfish etouffee.

You start with what my dad calls the "Holy Trinity" - onion, bell pepper, and celery.

Dice these (or if you're being lazy like I was tonight, use a food processor).

I also threw in some garlic and red pepper.


Saute them in 1 stick of butter until they are soft.  This took about 30 minutes over medium high heat.  If you're using a thick bottomed pan, they are very forgiving.  I think I stirred a total of three times. 

Then add the crawfish.

These are leftover tails I froze after my baby's first birthday... but I only had 1 pound and I wanted enough to freeze...

So I threw these in, too.  Buy local :)


Then I added 2 tablespoons flour, a little more salt and red pepper, and 1 cup of water...

And serve, over steamed white rice!

The baby was very proud of his efforts.

Condensed recipe below:

Crawfish Etouffee (adapted from Landry's Restaurant in New Iberia)
2 large onions, diced
2 green bell peppers, diced
2 ribs celery, diced
2 cloves garlic, diced
1 stick butter
1/4 tsp crushed red pepper flakes (if you are not trying to feed picky children, definitely increase this)
1 tsp salt
1 tsp black pepper
2 lbs crawfish tails, peeled and cleaned, with the fat
2 Tbs flour
1 cup water

Saute the onions, bell peppers, celery, garlic, red pepper, and salt in the butter until the vegetables are soft (approximately 30 minutes).  Add the pepper and the crawfish tails.  Cook until bubbling.  Add the flour.  Stir until smooth.  Add the water and cook until bubbling.  Serve hot over steamed white rice.  Serve with French bread and a green salad.

Saturday, October 29, 2011

Monster Cookies - what trick-or-treaters get at my house :)

 This is my ridiculously-cute nephew, Nicholas.  He came over today because
1. we were carving pumpkins (again... the first developed a bug/mold problem in a ridiculously short amount of time.  About 2 days.  This is what comes of 90 degree weather + humidity in late October.)
2. We are tearing down part of our house.  So there are jackhammers and sledgehammers and dust and concrete debris and all sorts of other things little boys love.
3. We made monster cookies - pretty much the best little boy cookies ever.

First, we mixed up the dough.  Even two 5 year olds cooking couldn't make my kitchen as dirty as the chaos outside :)

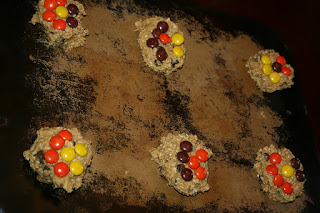
Then I scooped the batter out for them and they made monster faces using Reese's Peices (you can also use M&Ms, but I liked the orange-black-yellow color scheme.
 These were Nicholas's cookies.  He loved making faces. 
 This is one of Dixon's cookies.  I think he was channeling Picasso.

Either way, the finished product was delicious!  I doubt the trick-or-treaters will complain.


I stole this recipe from my mother-in-law... these are one of my husband's favorites.

Ingredients:
1/2 cup butter or margarine softened
1 cup sugar
1 cup plus 2 tablespoons firmly packed brown sugar
3 eggs
2 cups peanut butter
1/4 teaspoon vanilla extract
4 1/2 cups quick oats uncooked (may also use old-fashioned for a different texture)
2 teaspoons baking soda
1/2 teaspoon salt
1 1/2 cups chocolate morsels
1 cup (or more) M&Ms or Reese's or other candy coated chocolatey bits of goodness.


In the bowl of an electric mixer with the paddle attachment, beat the butter and sugars.  Add the eggs, peanut butter, and vanilla.  Beat until well combined.  Add the oats, soda, and salt.  Beat on low until just combined.  Add chocolate chips.  At this point, you can also add the M&Ms, but I like to let the boys make faces.
Scoop VERY LARGE scoops onto a cookie sheet.  You can use a 1/4 cup measuring cup for this, or a melon baller, giving each cookie 2 scoops.   Drop the dough about 3 inches apart on a cookie sheet.  Spread out M&Ms and let the kids make monster faces.
Bake at 350 for 10-12 minutes (depending on cookie size).  The outside edge of each cookie should be light brown.

Sunday, September 25, 2011

Cupcakes for the Cure - and Wilton's Chocolate Buttercream Frosting

How fast would you run for one of these?


 A few years ago, a dear friend and colleague of mine was diagnosed with breast cancer.  Her students came to me and asked if we could run the Susan G. Komen Race for the Cure as a group, for her.  I said of course! But they were worried about participation.  Even with such a great cause, it's hard to get teenagers to want to get out of bed early on a Saturday morning to run.  So I announced that anyone who beat me in the race would get a cupcake :)  I have found in my 8 years of teaching that teenagers are HIGHLY motivated by food.  And competition.

To achieve this, I used a large Wilton open star frosting tip with the jagged edge.


I made the frosting, then I cut the end off of a Ziploc bag (although I highly recommend a frosting bag if you have one... I used to, and it's recently disappeared :( But my birthday is only a few days away!)


For the cake, you can make my mom's chocolate cake, or this Ina Garten version that is even softer and richer than mom's (sorry, Mom!). 

But what really makes these special is the buttercream icing. 

Here's the recipe, adapted from Wilton and my mother-in-law - the queen of all things frosting!

1/2 cup solid shortening (I buy the Crisco bars - they rock!)
1/2 cup salted butter at room temperature (DO NOT microwave this to soften it!)
3/4 cup dark cocoa powder (Hershey's is fine)
1 tsp vanilla extract
1 bag powdered sugar, plus more as needed
1/4 to 1/2 cup milk (I used skim)

In the bowl of a large electric mixer, beat the shortening and butter.  Add the cocoa powder.  The more you beat the cocoa powder, the lighter it will get, so be careful if you want a dark icing.  Add the vanilla and beat until combined.  Alternately add the powdered sugar, 1 cup at a time, with the milk, 1 Tablespoon at a time.  You may need more milk or more powdered sugar, depending on the consistency you want.  To make a very thick frosting, you may need 1 cup more than the bag of powdered sugar.

Use a spatula to spoon into a frosting bag or Ziploc bag, fitted with the appropriate tip.  Go to youtube for a video, or visit my mother-in-law for a step-by-step tutorial on how to make pretty cupcakes :)

Enjoy!

p.s., I think I'm going to find some pink sprinkles for these guys before I get to school in the morning.  

Monday, September 19, 2011

Easy Homemade Hot Fudge Sauce for ice cream

Hot fudge sauce on ice cream - is there really anything better?


This (along with homemade pizza) has been the recent obsession at our house.  Of course, my husband desecrates it by dipping cream puffs from Walmart in it... apparently his way of saying I don't make cream puffs often enough...

Anyway, the reason I love this hot fudge sauce so much is that even when you put it over ice cream, it doesn't get hard and crunchy... nor does it puddle in the bottom of the bowl (like the thin stuff you get out of a bottle).  It's perfect... and very easy.

Place a pan of water on the stove.  Put a heat proof bowl on top.  Voila - you have just created a double-boiler, perfect for melting chocolate.  (I have no success with doing this in the microwave - the chocolate or the cream always burns or curdles or does something otherwise unpleasant.  However, if your microwaving skills are more advanced, feel free to melt the chocolate in the microwave).

In the bowl, place 6 ounces of semi-sweet chocolate (chips are fine, but I had bars on hand - if you are using chips, this will be about 3/4 cup).  Add 1/4 cup heavy cream.  Heat until the chocolate melts. Stir until smooth.

Remove this from the heat.  Stir in 1 tablespoon of honey and 1 tablespoon of coffee.

And that's it!

Adapted from Barefoot Contessa

1/4 cup heavy cream
6 ounces semisweet chocolate
1 tablespoon honey
1 tablespoon coffee

Heat the first two ingredients on the top of a double boiler until melted.  Stir in honey and coffee.  Will keep in the refrigerator for up to a week.


Wednesday, September 14, 2011

Cucuzza soup (summer squash soup)


I love my neighborhood.

It's been an insanely busy few days at my house... but this afternoon, the neighborhood kids organized a huge game of hide-and-seek that kept my older son entertained for two hours.  Do you know how much you can get done with only one kid in two hours?  Especially if you are used to two?!


So my little man and I decided to do something with a squash given to us by our neighbor down the street.  It's a weird Italian squash, called a cucuzza.

(Oh, and don't be alarmed, this is definitely NOT a 2 hour recipe - the soup took about 30 minutes... it was the mountain of laundry that took the bulk of the afternoon).


As you can see, it's quite a bit longer than your average toddler (and for some reason, this will NOT rotate!).
I was introduced to this soup by Christina, one of my best friends from high school, while we were both living in New Orleans.  It was handed down from her grandmother, which definitely means it's something special.  She has the type of grandmother who invites the whole family (somewhere around 42 first cousins) over for spaghetti every Sunday - and believe me, if they're in town, they show up.  

Christina's mom, Christina, and her grandmother, Gammy

The other great thing Christina taught me about this soup is that you don't have to have funky Italian squash to do it... just plain old yellow squash and/or zuchini work great.


 Oh, and the other weird thing about this soup is that you poach eggs in the tomato broth toward the end... but trust me, it's amazing.

Recipe below!


1-2 lbs summer squash (zuchini, yellow squash, and cucuzza all work well)
2-3 cloves garlic, crushed
2 tablespoons extra virgin olive oil
1 (15 oz) can tomato sauce1 tsp dried oregano (1 tablespoon if you are using fresh)
1 cup water
2 cups chicken stock
1/2 cup wine
5-6 whole eggs
1/4 cup Parmesan cheese, grated


Slice the squash into thin rounds.  If you are using real cucuzza, you need to peel it first; yellow squash and zuchini both work well with the skin still on.

In a stock pot or other soup pan, heat 2 tablespoons of extra virgin olive oil until sizzling.  Add the crushed garlic and cook briefly. Add the squash and saute until tender (about 10-15 minutes).  Add the tomato sauce, water, chicken stock, wine, and seasonings.  Bring to a boil and cook until the sauce changes color slightly (more of a brownish red, but it's subtle).  This takes about 15-20 minutes, but the soup is forgiving and can cook a little longer. 

About 10 minutes before you are ready to serve this, crack each whole egg into the soup.  Spread them around the pan and DO NOT stir until they have had a chance to cook a little.  You are basically poaching the eggs in the tomato broth.  Cook the eggs until their centers are firm.

Garnish with freshly grated parmesan cheese (a lot!) and serve with French bread and a green salad. 


Enjoy!!