The pickle man

Monday, January 17, 2011

Deer: It's what's for dinner

This is my baby brother (well, he's 20 now and considerably taller than I am, but still) with his latest trophy buck.  In my neck of the woods (yes, I said it), this is a pretty big deer.  For all of you hunters, this one scored a 144.

 Joe will now be the only student at Tulane with two trophy bucks mounted on the wall (I'm guessing, here, but since I'm an alum, it's an educated guess).  I hope his landlord doesn't read my blog.

Hunting is a way of life for most of my family - men and women.

My little sister - probably around age 14 or 15 - with her first deer.  This is definitely NOT a trophy buck. 


Another sister with Dad over Christmas break - about to hunt.


Why, you may ask, do I not hunt?  Since gender was never a reason in my family?  It's a short story.  My husband took me duck hunting in a pirogue that he built.  He dumped me out (accidentally?). I didn't want to be whiny (then, at least) so I endured the next 2 hours of the freezing cold hunt (in Louisiana, 38 qualifies, especially when you are soaking wet).  I promised myself that once we were out of the woods, I wouldn't go back in.  And so far I've kept that promise.


Oh, and I don't want blood smeared all over my face.

 I used to worry about my sons' psyche, with all of this killing and bloodshed. I mean, we feed the ducks on the bayou all year, but his father, grandfather, several aunts, and uncle shoot ducks and deer for a few months a year... I haven't let him watch Bambi yet.  We stick to The Lion King, where eating antelope is part of the circle of life.

He asked his dad yesterday "When are you going to kill some more ducks?  They are really pretty and you can pet them because they hold still."  Um, YIKES!

And when he was 2, his father briefly used his swingset as a deer-cleaning station.  I'm sorry now that I don't have better photographic evidence.  But that's got to be disturbing for a two year old.

My friend's kid, about 5 at the time, was not the least disturbed.  In fact, this may be the origin of his infatuation with hunting.  Notice that for some reason, the poor deer is not the center of this photograph.

My own, sweet son, aged 2 at the time, looking at me with a very troubled expression. 
Well, life philosophy aside, the reality is that a fair amount of hunting goes on in this house.  Maybe Michael Pollan (The Omnivore's Dilemma) would be proud.  At one point in the book, he says something about hunting no longer being a way of life, except for certain "pockets of the country."  I live in a pocket.

Here's how I sometimes cook the deer.


When you pull venison steaks out of the freezer, they don't look very appetizing.  Now that I think about it, they don't look any better when you pull them off of the deer.


First, I used this really cool Jaccard meat tenderizer Santa gave me
This is Jaccard's photo.  It's a pretty cool little kitchen gizmo.  But don't let your kids play with it. 


The result looked like this.


Then I put some flour in a shallow bowl and seasoned it with salt, garlic powder, and black and red pepper.  Oh, and I recommend tasting the flour (before you dip the meat in it) to taste for seasonings.  Yes, it will still mostly taste like flour, but you should get some hints of the other stuff. 

Drop the deer steak in there, flip it over, and get the flour to stick to it as much as you can. 


Meanwhile, your oil should be heating on the stove.  I recommend a cast iron skillet.  But ideally, you need one with a lid that will fit. 
I was not so lucky.  I made do with an inverted serving plate, but it wasn't pretty. 

After your meat gets nice and brown on both sides, remove it to a paper-towel-lined plate to drain.  Then toss in some diced onions. 

Once those get browned and delicious, add 1/4 cup or so of flour.  I use the seasoned flour left from dredging the meat, but whatever.  Stir until it is a smooth, brown paste.  Brown it a little more.  Then add enough water to make a thin gravy.  Don't worry - it will thicken up.  
Put the meat back in and let it cook for another 15 minutes or so. 

Serve over rice, mashed potatoes, or even just with bread.  

I promise, you'll forget it's venison. 

Condensed recipe:
1 lb round steak or venison steak, tenderized (you can also use a meat mallet)
1 cup flour
1 Tbs salt
garlic powder, black pepper,  and red pepper to taste
2 Tbs vegetable oil or butter (plus more, if the meat starts sticking)
1/2 cup onion (optional)

Heat the oil in a skillet.  Mix the flour and spices together.  Dredge the meat in the flour mixture.  Fry in the hot oil, about 1 minute on each side.  Remove to a paper-towel lined plate to drain.  Add the onion and fry until slightly brown around the edges.  Add the flour and stir.  Add water until you have made a thin gravy (taste for salt and pepper)  Return the meat to the gravy.  Cover and cook on low 10-15 minutes (or longer). 

Serve to your hunters :)

Saturday, January 15, 2011

Louisiana Saturday Night - shrimp and grits

Sometimes weekend meals end up having to be ready faster than weeknight meals in my house (remember, I get off of work at 3 and live in a town with no commute - I'm terribly spoiled).  Whereas on Saturdays, sometimes we make it to multiple birthday parties and Sam's - with both kids.

This took less than 30 minutes.  My son's comment:  "These shrimp are excellent.  I like them so much I am going to give you a dinosaur sticker when I finish eating."  I am currently wearing triceratops on my shoulder (apparently he is reserving the blue T-Rex for more amazing feats).


Shrimp were on sale this Friday at the grocery, so I bought some.  I wasn't entirely sure what I was going to do with them, but sometimes I force myself to be creative.  If my family had to eat only what I felt most confident cooking, we would rotate among grilled chicken, pasta, bread, and my mom's chocolate cake.

But back to the shrimp.  After I bought them, we got invited to dinner at a friend's (for some truly amazing gumbo), so the shrimp were put on hold until tonight.   I didn't want to leave them any longer - they had to be on sale for a reason, right?


Anyway, for the sake of specificity, this was one pound of 31-40 count, shell on, previously frozen, Louisiana shrimp.  They thawed for a day in my fridge (in 2 plastic bags).


So, my time break down - less than 30 minutes with both kids.

First, I put the baby in the baby seat and gave him some green beans (out of a can) and some graham crackers. Oh the things my 2nd child eats.

Then I diced an onion.  If you aren't an expert onion dicer, watch this  (this is exactly how I do it, minus the 2 horizontal cuts, which I think are unnecessary).


Melt 1 tablespoon of butter in a cast iron skillet (I love this thing - it gets easier to clean the more you use it - how many kitchen tools can you say that about).  Add 1/2 onion, chopped, and a pinch of salt.  Add a bell pepper if you have one.  I didn't.  Saute until clear.  While this is going, peel the shrimp (pausing every 5-10 shrimp to stir the onions and replenish the green beans for the baby).

  Add 1 tsp jarred garlic and a can of tomatoes (I had mild rotel, mixed with green chiles, but I would have used anything on the shelf).  Add approximately 1/2 cup of white wine and 1 Tablespoon Worchestershire.
Cook this for about 5-10 minutes.  Meanwhile, start the grits.
whisk = the key to non-lumpy grits

To make grits, I use 2 cups of water and 2 cups of skim milk (the milk makes them creamier - for more flavor, you can also use chicken broth).  Bring the liquids to a boil (with a little salt).  Then pour 1 scant cup of grits in a slow stream while whisking constantly.  Then cook, stirring occasionally, for about 5 minutes.
My 4 year old took this picture - he wanted in on the action - this is me pouring grits in a stream while whisking :)  Guaranteed lump free
 - side note - I do love cheese grits, and you could definitely add cheese to your grits, but I didn't have any grated cheese in the fridge, and there was way too much going on in the kitchen for me to stop and grate any.

Meanwhile, add the shrimp to the onions and tomatoes.  Cook, stirring occasionally, until the shrimp are pink and opaque.  I added 1 more tablespoon of butter at the very end to "finish" the dish, and sprinkled a little dried parsley, but this is optional.

Serve the shrimp over the grits.  I also served French bread from my freezer and a green salad (out of a box, but I did add arugula and radish sprouts from the garden - for more info on the garden, check out the blog my husband started today... yeah, he was jealous.  Or he wanted to steal my excuse for un-interrupted computer time). Oh, and I used bottled dressing.  Yes, I should whip some up and store it in the fridge, but I love Brasewell's Vidalia Onion and Peppercorn more than any salad dressing I've ever made. 


Condensed recipe:
For the shrimp:
2 Tablespoons butter
1/2 yellow onion, diced
1 can mild Rotel tomatoes and green chiles
1 tsp miced garlic
1 Tablespoon Lea and Perrins Worcestershire
1/2 cup white wine
1 lb peeled uncooked shrimp

Melt 1 tablespoon butter in a skillet.  Add chopped onion.  Saute until clear.  Add tomatoes, garlic, Worcestershire, and wine.  Cook 7-8 minutes.  Add shrimp.  Cook 7-8 minutes.  Add the remaining tablespoon of butter.  Serve over grits (with French bread for sauce dipping, if at all possible).


For the grits:
2 cups water
2 cups skim milk
pinch salt
1-2 Tablespoons butter (optional)
Cheese (optional)

Bring the liquids and salt to a boil.  Whisk the grits into the boiling mixture in a slow steady stream.  Cook 5-7 minutes.  Add the butter and cheese (if using) at the end.

As a bonus, we discovered that the baby absolutely LOVES grits - good to know, since he still gags on rice cereal. But then, if given the choice, I'd go for the grits, too.

Tuesday, January 11, 2011

What to do with bread that FAILS - Bread Pudding

I make a lot of bread.  Usually, it turns out great.  Sometimes, it turns out not so great.
ARGH!  Did someone step on the bread?!

I volunteered to make homemade bread for my sister-in-law's pokeno party.  Instead of my normal French bread, she wanted bread like her mom's.  I've made that lots, too, and usually it is very easy and comes out great.  Not this time.
BTW - I definitely sent the loaf in the back to my sister-in-law.  It's the one in the front that got reincarnated as bread pudding.

My mother-in-law says it has to do with the weather - if it's really humid (aka that yucky frozen rain stuff) that you should add less moisture to the bread.  So now we both know...

But tonight we had bread pudding.  I've heard that you can also do this with stale bread, but no bread has ever lasted in my house long enough to get stale.  However, this is so delicious that I'm tempted to hide a loaf next time I make bread.

Ingredients:
1 large loaf French bread - stale, misshapen, or in any other way messed up
4 cups milk (I used skim)
1 cup raisins
1 cup whipping cream (or half-and-half, if it makes you feel better)
4 extra large eggs, or 5 of the normal kind
2 cups sugar
1 Tablespoon cinnamon
1 teaspoon vanilla
1 generous pinch salt
1/4 cup butter, for dotting on the top (optional)
1-2 Tablespoons brown sugar, for sprinkling on the top (optional)


Method: 
Tear up the bread (Or if you like a neater presentation, chop into 1 inch cubes - but then your 4 year old won't have nearly as much fun helping).  Place the bread in a large bowl. 
Already the bread is looking better

Put the raisins in on top of the bread (they deserve to soak up all the yumminess, too).   
In a separate bowl, mix the eggs, milk, cream, sugar, cinnamon, vanilla, and salt.  Pour this over the bread.  Let it soak for 15 minutes (long enough to bathe one 9 month old child).  Also, preheat your oven to 325.

Dump the now soggy bread mixture into a 2 quart casserole dish.  Smoosh it down (also fun for the 4 year old).  Sprinkle the butter and the brown sugar on top (this is completely optional, but I love a crispy sparkly top).  Bake at 325 for approximately 1 hour and 30 minutes (start checking at 1 hour 15 minutes).  The middle should be set, but not firm (unfortunately, the toothpick trick doesn't really work on this one) - basically, the edges should be brown and crusty, and the middle should jiggle like Jello, but not slosh around.  

The picture is courtesy of my husband.  I had a meeting :)

This is amazing and delicious...

Oh yeah, and the bourbon sauce (you can also use rum, but why?).  I didn't make this tonight, but I usually do. 

1/2 cup cream
1/2 cup sugar
1 Tablespoon butter
1/4 tsp cinnamon
1/2 tsp cornstarch, mixed with 1/4 cup cold water
2 shots of bourbon

Combine sugar, cream, butter, and cinnamon.  Stirring frequently heat until simmering (bubbles should not be breaking on the surface - if they do, just take it off the heat).  Add cornstarch mixture and cook, stirring, until thick and not cloudy.  Take off the stove and stir in the bourbon (*or, if you are serving to small children, stir in the bourbon and continue cooking until the alcohol has evaporated).

Enjoy!!

Monday, January 10, 2011

Snow day comfort food? Venison chili

Today it is snowing in north Louisiana.  Or sleeting, or freezing raining, or whatever - my son is ecstatic and I'm wanting something yummy and warm to eat.
My son and his cousin, sledding down the levee.  Notice that there is no snow and very little ice in this picture, but we still had a "Snow Day."

 Why is it that so many comfort foods (chicken pot pie, macaroni and cheese) leave me feeling guilty, not comforted?  Normally I'd cope by running but I don't run in the sleet.

So instead, I'm going to get some of the venison out of the freezer.

My brother is quite the hunter.


This is one of seven frozen portions of deer meat in my freezer currently (well, actually most of this one is now in my tummy, but you get the point).
And so the inside of my freezer is usually full of deer meat, which is a good problem to have, especially when it is cold and you want comfort food that doesn't make you feel guilty.  You can definitely make this with hamburger meat, too :)
red beans soaking!  

For each pound of meat, you will need
1 yellow onion, chopped
1 green bell pepper, chopped
1 rib of celery, chopped
1 lb of dried red beans, soaked overnight OR 2 cans red beans (my favorite brand is Van Camp's New Orleans Style red kidney beans, but they are kind of hard to find).
2 cloves garlic (I cheat and use 2 tsp minced, jarred garlic)
1 can diced or chopped tomatoes
1-2 bay leaves
1/2 tsp red pepper

2 Tablespoons chili powder (use less if you don't like it spicy)
Kosher salt to taste (but don't add the salt until the end, or else it will make your beans tough).
Water to cover (you will need a lot more water if you are using dried beans instead of canned).

Saute the onion, bell pepper, and celery in 1 Tbs vegetable oil until clear and soft.

  Add the garlic.  Add the ground meat and brown.
If you are using beef, you will need to drain the fat.  Venison is much leaner, so no draining is needed - which is definitely good, since I have been known to pour half the meat down the sink with the grease... still working on my draining skills.

   Add the beans and tomatoes.  Add water to cover.  Add the seasonings, except salt (see note above).  Cook 1-2 hours (depending on canned or dried beans - canned cooks quicker, but dried tastes better) or longer, adding more water as needed. 
Serve with cheese, saltines, sour cream, or whatever you fancy.   

This picture is 100% posed.  My son told me he was finished eating and I realized that I hadn't photographed the chili, so I begged him to take another bite.  This was as close as I got.  

Note: I usually triple this recipe and freeze it.


The baby was more than willing to eat a bite of chili, but I didn't give it to him. Yes, I watched Mr. Mom in the 80s.  I will never feed a baby chili.

Saturday, January 8, 2011

Guacamole - and other things I don't tell my pediatrician that I let my 9 month old eat

My first child was always opinionated about food.  Even with relatively healthy choices, he let me know what he liked.

Sweet potatoes - YUCK

Watermelon - YUM
This face clearly says STAY AWAY from my watermelon!!!


Currently, he is on a semi-hunger strike and only gets excited about eating bread dough and Ben and Jerry's Cherry Garcia ice cream (he gets that from me).  I try not to worry - according to my mother, my sister Clair ate nothing other than apples and cheese for approximately 4 months, and she survived :)
The face my son made when I convinced him to try some guacamole


The baby, on the other hand, will eat almost anything... as long as it's not baby food.


Yummmm..... Leaves!


Which brings me to the guacamole...

He doesn't like plain mashed avocado - too close to babyfood, I guess.  But throw in lime juice and tabasco, and the baby loves it:
He grabbed the spoon when I put it down to take a picture


The other reason I'm making guacamole is to finally use these tomatoes that still linger on my counter from the garden.  Yes, it's January.  And I have tomatoes from my garden.  I also went running yesterday in a sleeveless shirt and shorts - and tomorrow it's supposed to snow.  I live in Louisiana.
Not the prettiest tomatoes I've ever grown, but it's January.  I'm not complaining.

To make delicious guacamole (even in January), you will need


3 large ripe Haas avocados
1 1/2 Tbs fresh squeezed lime juice (approx. 1/2 large lime)
2 cloves garlic, minced
1 jalapeno, seeded and diced
1 small ripe tomato (or 1/2 large), seeded and diced
5 dashes Tabasco
1/2 tsp coarse kosher salt
1/2 tsp fresh ground black pepper


Peel and pit the avocados. 

I saw Tyler Florence on the Food Network say that the easiest way to get the pit out of the avocado is to chop the pit with your knife, then twist... He was right - it came right out, leaving me with a pit on the end of my knife.  A slippery, round one that I COULD NOT get off without seriously jeopardizing the tips of my fingers.  Finally I beat the thing against the cutting board until it split in half and rolled on the floor, where William immediately tried to eat it.  Again, it's not baby food and therefore must be delicious.  Dixon thought my whole avocado experience was done exclusively for his entertainment.  There must be a better way.

Chop into very large cubes and place into a mixing bowl.  Squeeze the lime juice over the avocados as you place them in the bowl, so they will not turn brown.  Add all other ingredients and stir until just combined – avocado should still be chunky.  Serve chilled or at room temperature with tortilla chips.  Also great on fajitas and hamburgers.

I really like chunky guacamole, so I chop the avocados into 2 inch cubes.  Mash with a fork if you like it creamy, or add 1 Tbs sour cream. 

I love serving in this pretty blue bowl - my husband used to make these, back when he had spare time :) 

Thursday, January 6, 2011

It's King Cake time!


Welcome to January 6: The Feast of the Epiphany, 12th Night, the final day that it's still OK to have a Christmas wreath on my door (which doesn't mean it will get taken down - I'll probably forget.  If you drive by, try not to judge).

And in Louisiana, it's the official start to the Mardi Gras season.  We've given ourselves almost a week to recover from New Year's, so it's definitely time for a party.

At my house, that means I'm going to make a king cake :)


For a long time, I didn't understand everyone in my native state's obsession with this thing - I always thought it tasted like dried out cinnamon bread with too-sweet frosting.  Again, enter the marvelous mother-in-law... King Cakes are amazing when made from scratch.  I actually love them hot out of the oven, with warm, gooey cinnamon filling.

Ingredients:
For the dough:
1 stick melted, cooled butter, plus 1 Tbs softened, for the bowl.
2/3 cup milk, room temperature
1/2 cup sugar
2 tsp salt
2/3 cup warm water

2 envelopes or 5 tsp yeast
4 eggs

6 cups all purpose flour

Combine the butter, milk, sugar, salt, and water in the bowl of a stand mixer with the paddle attachment. Add yeast; let sit for 2-3 minutes, until frothy.  Beat in eggs one at a time.  Add flour and beat until just combined. Turn out into a buttered bowl.  Allow to rise for 1 1/2 to 2 hours.  The dough will be very sticky and won't rise as much as bread dough.

Roll out the dough into a long, thin rectangle (or as close as you can get - here's my attempt)


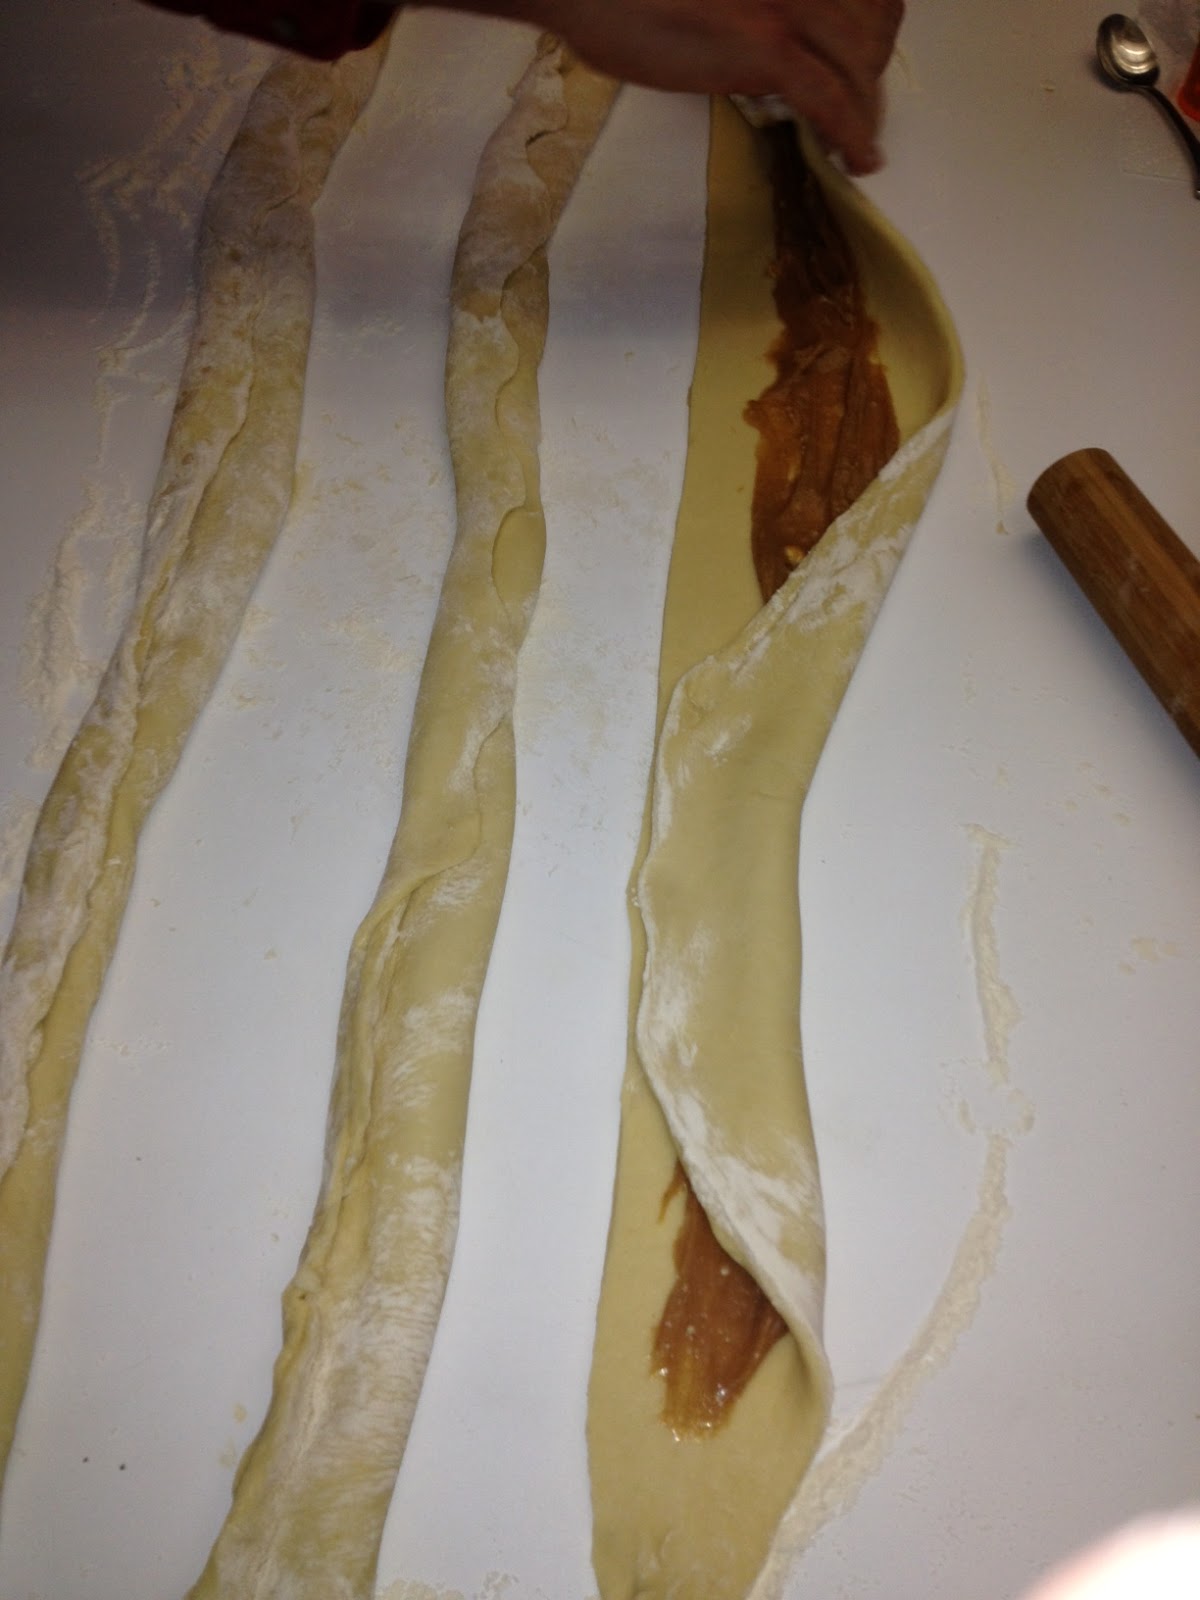
Then divide it into three strips (if you are braiding it).  Otherwise, just fill the rectangle.


For the filling:
1 block cream cheese, very soft (I microwave these on half power)
1/2 stick butter, very soft
2/3 cup white sugar
1/2 cup brown sugar (dark or light)
1 Tablespoon cinnamon

Combine.  Spread down one side of the dough.


Fold the dough lengthwise or roll, so that the cinnamon filling is in the middle of each strip.


Then, braid!


Braiding is much easier of you start in the middle and go all the way to one end.


Gently lift the middle section and place it on a flat baking pan or a stone.  If you are transferring it to a pretty platter, bake it on parchment paper.


Shape it into a circle and tuck in the ends.


Let it rise for 20-30 minutes.  Again, it won't quite double.  And you don't have to cover it this time.

Bake in a 350 oven for 20-30 minutes, until golden brown.  Allow to cool slightly.

Then, carefully slide the cake and the parchment paper onto the serving plate.

For the glaze:
1 cup powdered sugar
1-2 tbs milk
Colored sugar - purple, green, and gold.

Spread the glaze over the cake while it is still slightly warm.  The icing sets up fairly quickly, and when it does this, the colored sugar doesn't stick as well, so I usually do 1/2 the cake at a time.  Sprinkle with alternating colored sugar - purple, green, and gold.  My boys love helping with this part.


And don't forget to tuck a baby inside! You can buy them online or save ones that you find in a king cake :)   The finder gets to make (or buy, for the faint at heart) the next king cake.


Laissez les bons temps rouler!!